SAILS, RIGS AND DECK EQUIPMENT
INTRODUCTION

If you're not an experienced sailor with a clear vision of the sail wardrobe you want to work with, the type of rig that will work best for your budget, and the best layout for the control systems; then this article points out some of the advantages and disadvantages of the various options and it presents a structured process for selecting the equipment and planning a deck layout to make it all work seamlessly.
While the rig, sails and control systems can each be considered in a category of their own and manufactured or supplied by a specialist working in just that category, the integration of the three elements and clear communication is critical to a successful meeting of the technologies.
This can only be achieved with planning and management that must be carried out by the owner, a builder working on your behalf, or a specialist who understands importance of ensuring that design, manufacturing, and equipment selection needs to be carefully integrated and coordinated.
Whether your'e setting up a new boat or reinvigorating an older one it's important to visualise the rig, sails and deck hardware as three interactive systems with the features of each having implications for the design and specification of the other two.
In past decades you might have been provided with a sail plan, rig plan and deck layout by the designer, and by simply following the drawings and specifications you could expect to have a fully functional sailing boat with no need for a lot of head scratching in the process.
More recently we've seen rapid development in the technologies of deck hardware, rigs and sails, including structured luffs, top down furling systems, the adoption of halyard locks and a broad range of options available within each of these technologies. If you're out there racing every weekend or if you are a highly experienced cruising skipper then you are probably familiar with the advantages and the possible pitfalls of all of most of these technologies. On the other hand if it's your first boat then the array of decisions that have to be made can be daunting.
There is process for putting it all together. Start with the sails, then the rig and finally the control systems, but don't expect to finalise any one of these categories until you've made decisions in all three areas and then refined them all by talking to the experts you're going to be working with and going back over the details to make sure all of the technologies are going to work in harmony.
PART 1. SAIL SELECTION for MULTIHULLS
getting started on sail wardrobe selection
How much performance do you want as opposed to ease of handling, affordability, long life and simplicity? Do you expect to add more sails to the wardrobe over time? These are the factors that will affect the sails you purchase. Start out by making decisions about these factors and talk them though with your sailmaker.
1. Mainsail.
The mainsail is pretty straight forward, and apart from possibly adjusting the mast height the main thing to consider is the width of the head or square top. Wider is more powerful but requires a robust sheeting system to achieve good leech tension and it can take more effort to raise and lower the main.
Headsail selection is more complicated and the decisions will be based on how many headsails you are planning on, where they will sheet to, and where the tack point will be located.
By headsails I mean any sail with the tack point forward of the mast, not just windward sails,
Selecting a headsail wardrobe has always been complicated and potentially confusing. The range of sail options available from the various lofts means you have a great range of sail types and materials to choose from, but potentially further complicates the decision making process.
Selecting a starting sail configuration
The ideal basic setup if the budget and deck arrangement allow is a three headsail arrangement not including the storm jib.
1. A working headsail tacked to the bow, most commonly a self tacking jib. For a little more power the working headsail can be sheeted on separate tracks either side and slightly aft of the mast. For the self tacking system the headsail sheet leads back to the cockpit after going forward on the deck close to the tack point, or leading up the mast, back to the deck and then aft to the cockpit. If the sheet is to go up the mast this needs to be communicated to the rigging company in the design phase.
2. Screecher or Code Zero
This sail fits the range between a genoa and spinnaker and in recent years has become popular as an upwind sail on multihulls. Screachers and Code Sails can do the same thing. The name Screacher is derived from combining reacher and spinnaker, so they were generally intended as downwind and reaching sails, as were Code sails which are still regarded as reaching sails on monohulls, typically with a mid girth measuring between 50% and 75% of foot length.
For multihulls the Code sail has developed into an upwind or close reaching sail largely as a result of the way it was rated under the OMR, tacked forward of the bow and providing substantially more area than the working genoa. It sheets inside the shroud and its size is limited by the foot length available before the leech engages the shroud. It is normally set on a furler and to be effective upwind it needs to be able to be tensioned with a tight luff.
My preference is that we drop the Screacher terminology and simply refer to these sails as Code sails, with the defining difference within the category being the area and the intended angles.
The code zero has lagely taken the place of the genoa on cruising catamarans because it avoids having tracks on the cabin top and the complication of leading sheets down to deck level.
3. Gennaker or Asymmetric Spinnaker.
This sail maximises downwind performance, especially in light air and gains maximum area by being sheeted outside the shroud and as far aft on the deck as possible. On a cruising boat the tack point might be the same point used for the Code Zero. On a high performance boat it is more likely to be set from the tip of a long bow pole. A variety of equipment can be deployed to make it easy to raise and lower the gennaker including furlers and snuffers of various types. If it is set on a furler and has a structured luff then its a gennaker, not a spinnaker.
4. Asymmetric Spinnaker
A free flying headsail that is designed for downwind angles and does not have a structured luff or furling gear. It generally requires a couple of fit crew members to deploy and retrieve the sail so is not a common addition to a cruising wardrobe.
For Asymmetric spinnakers you can safely call them A1, A2, A3 etc, with the number increasing as the sail gets smaller, gets tacked further aft, and generally gets hoisted lower on the mast, although two or more sails will sometimes share a common hoist. The A1 is typically hoisted to the masthead and and the tack is located at the forward point of the bow pole for maximum exposure.
Designer's Advice; Don't get too hung up up on what the sail is called. They will get called different names from loft to loft, from crew to crew and their design features will continue to evolve and confuse us if we let them.
What the sail is being called on any particular boat should be clearly labelled on the sail bag so there is no confusion when the sailing master calls for a sail change.

Time Machine using a large asymmetric spinnaker for power in the light air. The long bow pole not only enables more sail area but provides a large slot between the jib and the spinnaker, helping to clean up the air flow in the slot..


Sail Plan for Trimaran Venom. Sailmaker Ben Kelly worked closely with the owner on the development of the sail plan but the builder Jamie Morris and rigger Joel Berg were also closely involved in the process.
PART 2. RIG SELECTION GUIDE FOR MULTIHULLS

This is not an easy one to pull apart. Not so much because it's complicated but more because the advantages of one rig type over another are difficult to quantify and whichever way you go there will be trade-offs.
It involves weight saving, efficiency of flow over the sails, how much control you have over the shape of your main, your budget, your budget, your budget, and a whole lot of personal opinion that is not always easy to back up with science.
Let's look at some of the basics and see if we can provide some guidelines for choosing between carbon or alloy, rotating or non rotating, wing section or conventional wing profile.
This article is not going to tell you conclusively which rig is right for you - but it might help to point out some of the options and what the compromises are.
Rotating or Non Rotating
In theory a rotating wing section lines up the mast profile with the curvature of the luff on the lee side of the main, and by all logic of fluid dynamics this should increase lift. It almost certainly does on high performance multihulls. On cruising boats; that is boats with a lower power to weight ratio there may be a performance benefit as well but in my opinion it has often been overstated.
The fact that the OMR governing committee recently revised downward the handicap factor on rotating wing masts would seem to confirm this; however it is a difficult thing to quantify where a boat's performance is influenced by so many other factors.
So in making the decision whether to rotate or not we need to look at the other factors in effect.
• Because the mast rotates the halyards need to be cleated on the mast. If they are lead to the deck they need to pass through the foot of the mast rather than exit out the side as this will inhibit rotation. Another option that is sometimes employed on trailer boats is to exit the halyard out the side of the mast, tension it using a deck mounted winch and then cleat it off on the mast rather than on the deck. However this makes it complicated to adjust tension while sailing and requires additional rope.
• With a rotating rig the spreader rotates with the mast and will interfere with the jib if the diamond spreader is too long. The solution; short spreader, a double spreader rig, or a spreaderless rig. Whichever way you go the design of the rig and sails needs to account for the rotation factor.
• Because the mast is fitted to a ball rather than securely bolted to a deck plate there is potentially a lot more movement and there can be more noise generated from the banging around of any play in the fitting at the mast foot, or the side to side motion of the rotation spanner if it is not locked off securely.
• Fitting masthead instruments and nav lights is more complicated because they will rotate with the mast.
• If you are rotating a conventional mast section it may not be too critical to get the rotation angle exactly right, but if it is a wing section it is important to rotate the mast to the right degree to ensure clean flow across the luff of the sail. This is one more set of control lines and fittings required and one more adjustment to be attended to when tacking.
At right: detail of the mast plate and ball on trimaran Venom

Carbon or Alloy rig
The carbon rig is lighter and stiffer, and significantly more expensive. If you're serious about racing and have a light boat and an ample budget then the carbon rig is probably a no brainer. But even once you've chosen to go carbon it's not that simple.
There are different methods for making carbon masts, different grades of carbon, all with their individual strength characteristics, and different ways of supporting the mast that affect the weight and the price. This is a field for specialists.
My advice: If you're seriously considering a carbon rig choose one or two of the well established carbon rig manufacturers who have plenty of experience with your type of boat (especially size range) and start the discussion.

Wing Mast or Conventional Mast Profile
Just because you decide to rotate doesn't mean you have to use a wing section, although logically a wing will provide maximum gain from the ability to rotate. A conventional mast profile will still provide some benefit when rotated, it will be lighter and less expensive, and it will be less detrimental if you simply decide to lock it off to prevent it from rotating while you are cruising.
One benefit of the rotating mast, quite apart from the performance factor, is that when you are raising and lowering the main the mast will tend to remain head to wind even though the boat is
swinging in the breeze. This makes it easier to get the main up and down, an important factor with the large square tops we commonly deploy in our rigs these days.
At right; Mast spanner and gooseneck on trimaran Venom. Mast is partially rotated in this shot.

Rig Configuration
There's multitude of ways to support the rig sideways and every rigging company has their own methods of engineering the rig support to complement the standard sections they have available, or are able to manufacture.
The sail plan in combination with other factors; like whether the rig is rotating or not will be important factors in determining the number and the length of spreaders and whether the rig needs lowers or mast head support for the gennaker.
The ideal solution for the boat owner is to work with a rigging company and a sail maker who regularly work in cooperation with each other. This is not essential but mutual understanding and experience can help to streamline the process of setting up a successful sail and rig combination.
At Right; Single spreader carbon rig on trimaran Venom.


Above; Joel Berg (upper, (Allyacht Spars) and Ben Kelly (North Sails Brisbane), setting up the rig on Venom. Ben and Joel have years of experience sailing together and cooperating on projects. The mast and boom were supplied by Lorima in France and set up by Allyacht Spars in Australia.
getting out in front of the bow

You really can't finalise your sail plan without making decisions about where you're going to tack the gennaker and asymmetic spinnakers if you're going to have them. These images help to demonstrate why.
Above we have a really neat setup with an extendable pole designed and built by Alan Carwardine for his Stealth 42 cat Coconut.
Don't try this at home . It's fairly complex to build but Al is a master at rigging details and this is not his first attempt. The pole mostly lives inside the tube and it can pulled out to fly the asymmetrics.

I'm not sure about the sail arrangement here but I expect the inner furler is for the Code Zero or Screacher, the furler on the forebeam is the genoa, the furler on the pole is a gennaker, with a standup block on the pole extremity for an asymmetric spinnaker or flying gennaker. The pole can be removed if required to save on marina fees but probably lives as shown here most of the time.
This is a simple and relatively compact arrangement that can be built economically by any rigging company. Note that you need sturdy local reinforcement on the inboard side of the the hulls to carry the side load from the pole brace wires.
This is the bow pole arrangement on trimaran Venom. It is similar to the setup on Coconut in that it is partially retractable, but is different in that it spends most of its life extended but can be retracted when not in use.

Trilogy won the Australian Multihull Championships several times (we lost count) with a small profile non rating carbon mast built by Omohundro in the USA (yes, some time back). The long pole allows Trilogy to to fly the A2 with the screacher and still maintain a generous slot between the two sails. The slot between the A1 and the screacher is even wider.
A quick and dirty tip for assessing costs and weight saving.
1. Figure how much you are investing in your boat and how much you expect it to weigh.
2. Figure out how much you are saving in weight by selecting one option over another, and note the cost of the weight saving.
3. Compare the percentage of weight saved to the percentage of additional cost.
Example: You are investing 400k in your boat. It's going to weigh 4 tonnes at launch
The basic rig cost is 20k and the weight is 200kg .
The expensive rig option cost is 30k and the weight is 150kg
So you're spending an extra 10k which is 2.5% of your investment.
And you're saving 50kg which is 1.25% of your total weight.
This in itself may not give you the answer you are looking for because there are many factors apart from the cost and weight but its a simple way of assessing the cost of weight saving for all kinds of materials and equipment right through the boat.
PART 3. SAIL CONTROL SYSTEMS

Venom's deck layout was the result of a number of meetings that included the rigger, Joel Berg, the builder Jamie Morris, the sail maker Ben Kelly, and the on most occasions the owner Bob Dunn, all four being highly experienced multihull sailors.

There is any number of ways to send dagger controls aft. Using soft lashings as shown here avoids the need for making sure that hard blocks are mounted to lead the control lines cleanly for various height adjustment of the dagger board,
making decisions- follow the steps
Once you've determined the preferred sail and rig plan the decision making process for the arrangement of the deck equipment becomes pretty straight forward.
The are three big decision points in the deck plan that basically set the scene for the equipment you will need and where to locate it.
1. The first is how many halliards and reefing lines you wish to lead back to the cockpit, if any. This basically boils down to whether you are happy to cleat halliards and reefing lines on the mast or whether you prefer lines to come back to the cockpit so you don't have to go forward to change sails or put in a reef.
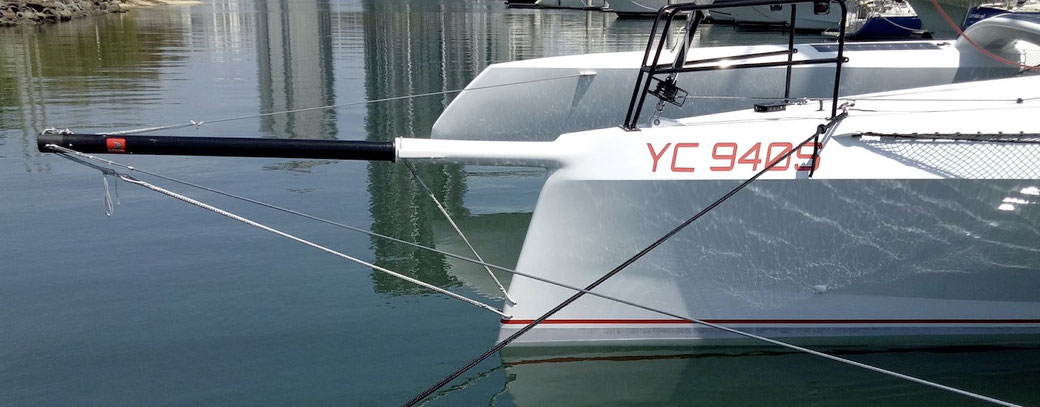
2. The second is the tack positions for the headsails, Whether you need a long bow pole, either permanently fixed or retractable. This decision relates back to the selection of headsails, and if you are going to have an asymmetric downwind sail as well as a Code Zero then you will most likely require a reasonably long bow pole.
3. The third decision is whether to have the working headsail sheeting to a self tacking track, and if it is; whether the sheet will go up the mast and back to the deck and aft to the cockpit, or go forward to the tack point before returning to the cockpit.
Bringing lines aft to the cockpit is convenient, especially if you are doing a lot of short handed or single handed sailing. Cleating them off on the mast saves purchasing additional hardware, reduces friction in the system and minimises weight by reducing the line lengths and hardware requirements. Cleating lines on the mast is more attractive option if you have, or are setting up for a rotating rig, but beware of positioning winches on the mast where they can catch genoa sheets when tacking. Some sail makers I know place an outright ban on winches on the mast for this reason.

Bow Pole setup on trimaran Venom
guiding the lines

Leading sheets and halliards down to deck level is a complication best avoided. Most cruising cats have done away with the genoa sheeted to the cabin top and instead have a self tacking track forward of the mast for the jib and a code zero sheeted to the deck beside the cabin.
Never mount manual winches above waist height or in a position that requires awkward body posture.

A lot of lines coming aft can use up a lot of deck space. double stack organisers can help to minimise the problem
airflow for a good night's sleep

Deck hatches are a major challenge when you're running lines aft to the cockpit especially if you don't have sufficiently wide side decks, but unless you have aircon and plenty of current to drive it deck hatches are essential for getting air flow into the aft cabin on a cruising cat.
They need to be located as far forward as possible over the aft cabin berth, a feature that seems to be overlooked by quite a few of the production cat builders.
A vertically mounted hatch aft in the cockpit will help to draw air through the cabin.
mainsheet and traveller systems


Mainsheet setup on Barefoot 40. A 2:1 main sheet and traveller system with a separate winch for the main sheet. You can get by with just two winches if you cleat the main sheet off, but if you like to push hard you'll probably prefer a separate winch for the main sheet as shown here.


Two ways to keep decks tidy. Tail stowage compartment (left) and leading lines under the deck (centre).

Self tacking jib track on trimaran Rapido (Melvin Morelli design) showing adjustable clew board and sheet line going up the mast, then back down and aft to the cockpit. This is a classic example of the need to coordinate the layout and the specification of the deck hardware, the rig and the sails.


Clean and compact. Chincogan 52 with lines cleated on the mast.


Here's a solution for keeping halliards and reefing lines on the mast, but not having a winch on the mast that might catch the sheets.
Carbon Copy uses a winch and clutches mounted on a forward facing rotation spanner.
This is really only suited to smaller boats because there's a limit to how many lines you can take to a single winch.


Two solutions to the same problem. Exit slots and clutch locations on the left are staggered to avoid creating a weak point in the mast. On the right the clutches are mounted on an integral pad helping to distribute the load..
halyards forward to deck locker


This is a great solution for halyards if you have enough space forward of the mast and don't mind going forward to reef. Lines from the mast come under the self tacking track, to an electric winch and disappear into the anchor locker. The boat is Chincogan 52 The Countess.


