BUILD YOUR RAKU CAT WITH A DuFLEX KIT BY FOLLOWING THESE NINE BASIC STEPS

Step 1. Kit Design
Work with us to finalise the details of the design you have chosen including any design options or additional modules to be included in the kit.
We will determine the laminates, the number of panels required for each laminate, create the cutting files and prepare a quote for the kit if it is not already priced.
Once the design details and pricing are confirmed you are ready to place your order.


Step 2. Unpacking
2. The kit arrives at your workshop door, usually by container, as a stack of 1.2m x 2.4m routed composite panels ready to be joined. The shipment will normally include additional reinforcements, resins, and ancilary products as specified.
Unpack the shipment and stack the panels out of the way of the space where the panels will be joined.
If you have purchased a joined kit many of the panels will already be joined up to the length that can be shipped in a container (12m).


Step 3 Joining the Panels
Set up the work space where the panels are to be joined.
The panels have a scarf join called a Z join that facilitate the join without needing tapes.
The joining can be done with a heated Z press that cures the epoxy join quickly. Alternatively they can be joined with clamping pressure.
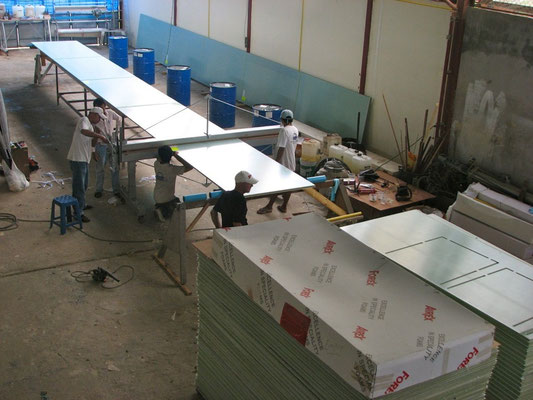
If the panel are are being joined with the Z press you will need an elevated work bench the full length of the longest panels you are using. (image below).
If you are joining them with a clamping technique the space can be on the factory floor.
A nesting booklet is provided with the kit to show how the panels are joined (right)


Joining the panels with clamping pressure


Panels are being joined into a single long panel by painting the surfaces of the scarf join with epoxy screwing through plywood battens that have a release film applied to one side.
Joining the panels with the Z Press


Step 4 Stacking Joined Panels
Once the joins are cured the panels are stacked to one side until they are needed for the job. The inividual parts should not be cut free of the panels until they are required.
Bulkhead and floor panels will be needed before the hull sides and cabin top so they should be left to the front of the stack wherever possible.

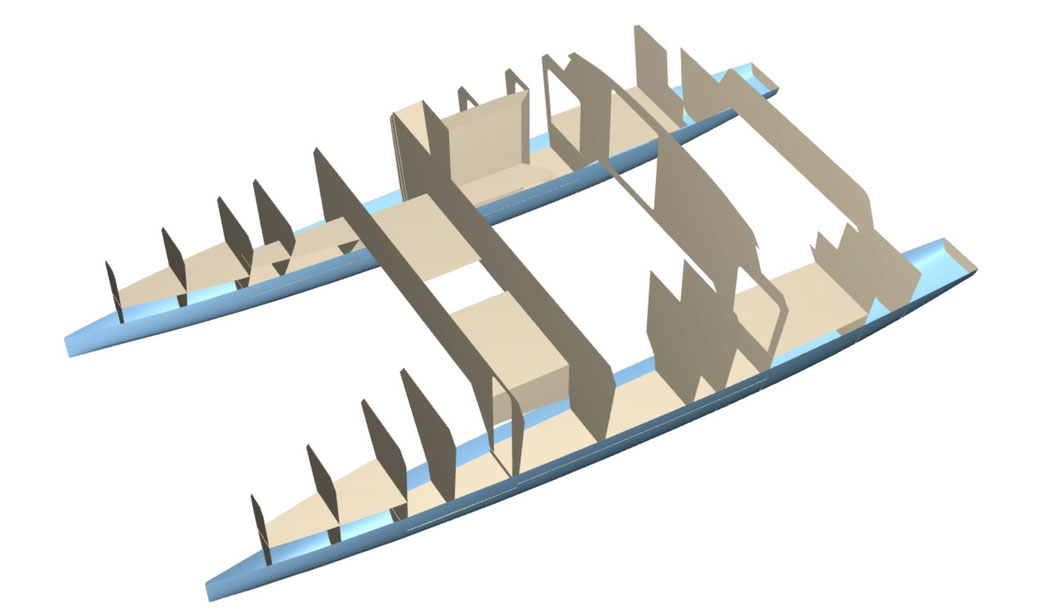
Step 5. Separating the Parts
When assembly is ready to begin the individual parts are separated from the panels by cutting the joining tabs. It is likely you will be building onto moulded hull bottoms that have been
built from strip planking or another method of building moulded components.
The process for building moulded components is described in another article.


Step 6. ASSEMBLY
As the joined panels are assembled onto the job you will need to apply glass tapes to the joins as specified in your plans.
Panels can be surfaced and coated inside and out with high build while they are on the workshop floor to minimise fairing time once they are assembled to the boat. The paint on the panels shown here has been kept back from the edges to provide a good bond for the tapes.


Smaller items such as steps, seats and dagger cases are nested into the kit and for the more complex parts diagrams are provided to assist with the assembly process.

Step 7. Interior
Interior kits can be ordered with the primary kit, or they can be ordered later when final decisions have been made about the interior arrangement.
A compromise solution is to order the interior as a set of plain planels that can be cut to shape on site after finalising the layout.


Step 8 Fairing, Painting, Hardware Installation
8. The DuFLEX construction process goes a long way to minising the amount of fairing that has to be done, but inevitably any boat that has not come out of a female mould will require some level of fairing and surface preparation prior to painting.
The fillers and resin systems required for the fairing work are normally supplied as part of the kit.
Hardware installation is the same as for any other form of construction using high density core inserts or consolidated laminate in way of fittings.


Step 9. Sailing
Go Sailing. This Barefoot 40 Catamaran was built entirely with a Duflex kit in Foam/Glass and Epoxy resin systems from ATL Composites

DuFLEX Kits are manufactured and supplied world wide by ATL Composites
And in Europe by VDL Composites
www.vonderlinden.de/her/28/vdL-Composites-GmbH
For more information on DuFLEX and associated Products
atlcomposites.com.au/category/27/DuFLEX


